 This past weekend, some parts of the Salt Lake Valley got their first taste of winter weather with snow falling in some parts. It’s a great reminder that we soon will be socked in with the white stuff, so take advantage of any good weather to get some of the fall outdoor maintenance projects done, including repairing the exterior of your home as needed to help prevent water intrusion.
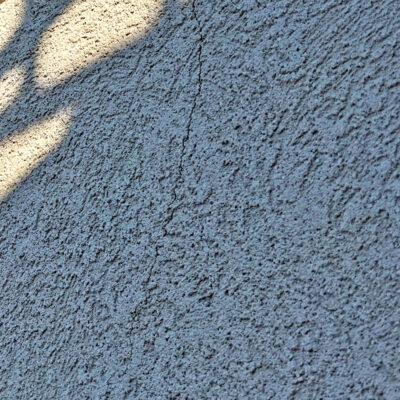
If you have stucco on your home, odds are you are going to find cracking when you inspect the exterior. Like concrete, stucco can be expected to crack due to its hard, inflexible nature that won’t move with other materials as they expand and contract in differing weather conditions. Even though there are waterproof membranes behind the stucco, cracks left unchecked can let water in and can cause damage to the structure of your home. It is best to repair cracks immediately to prevent them from getting larger, and the good news is that most homeowners can handle the repair of normal, small stucco cracks (1/2 inch wide or less).
Here are some basic instructions on repairing a normal, small stucco crack. Please note: While these steps can help you repair normal, smaller cracks in your stucco, but they do no replace the work of professionals, so if you are uncertain about doing this or your cracks are larger, consult with a professional.
Materials Needed
- Stiff Brush or Spray Bottle with Water for Cleaning
- Caulk Gun
- Stucco-Specific Caulk or Stucco Repair Compound
- Bucket of Water
- Sponge or Rag
Step 1: Clean the Area
Before applying the caulk or repair compound, you’ll want to get rid of any excess dirt and dust around the crack to ensure your caulk/compound will adhere properly. You can use a stiff brush to brush away any dirt and dust. Another option recommended by TheStuccoGuy.com is to wet the area down using a spray bottle with water. In addition to cleaning the area, TheStuccoGuy.com says the water will “also help to move the caulk around, make it squeeze into the crack and will allow you to wipe off the excess a lot easier.
Step 2: Apply the Caulk/Repair Compound
Cut the tip of the tube of caulking/repair compound as small as possible and at an angle. This will make it easier to apply the caulk/repair compound, give you a better line, and will require less cleanup. Before putting the tube in the caulk gun, make sure to puncture the interior seal if it has one. Once the caulk/repair compound is loaded in the tube, squeeze some out so you have an idea of how much material is going to come out when you squeeze the trigger on the caulk gun.
With your caulk/repair compound loaded in the caulk gun, it’s time to apply it to the crack. Be sure to apply a consistent bead in an even and generous matter along the crack with no gaps. You want the entire crack covered in a bead so it is sealed entirely.
Step 3: Spread the Caulk/Repair Compound into the Crack
Using your finger, rub the caulk into the crack. Rub in all directions to ensure you fill the crack entirely but be careful not to spread caulk all over the wall outside of the crack if possible. This will help cleanup be easier.
Step 4: Wipe Off Excess Caulk/Repair Compound
Place your sponge or rag in your bucket of water and saturate it with water. When you remove it from the bucket, you can ring it out a little, but you want it to be very wet. TheStuccoGuy.com says it’s better to have more water for wiping excess of than not enough. Take the wet sponge or rag and clean up the area around the crack but be sure to avoid the crack as much as possible to keep the caulk/repair compound inside it.
Once you have cleaned off all excess caulk/repair compound and it is in the crack only, you need to let it dry. The drying time will vary depending on the product’s instructions, weather conditions, temperature, and other variables. Leave it for at least a few hours, but to be safe, you may want to give it 24 hours to fully dry.
Step 5: Apply a Second Coat (Optional)
Caulking/Repair Compound has a tendency to shrink as it dries, so applying a second coat using the same steps as above is a good idea to ensure there are no gaps. However, this step is not required and can be skipped if your first coat completely covered the crack and gives you a good finish. On this coat, you can add some texture to the caulk/repair compound if you’d like it to blend better with the existing stucco. One option for adding texture would be to use a sanded caulk for the second coat, but TheStuccoGuy.com has other options for achieving texture here.
Step 6: Apply Color (Optional)
If you want the crack to blend better into the surrounding stucco, you may want to apply color. The easiest method is to paint the wall, but keep in mind it may be difficult to get an exact color match. The porous nature of stucco and its texture can create issues for color-matching programs. If you know the color that was originally applied that will help, but the new paint may still look different due to the effect of time and weather on existing stucco.
If you want to avoid painting, you can do a fog coat or an acrylic finish that has the aggregate taken out of it. The acrylic finish with aggregate taken out is achieved by running the material through a mesh paint screen, which keeps the color in tact but removes the aggregate to make a custom acrylic paint.
Looking for your dream home? Liberty Homes has been building new homes in Utah for nearly 30 years. We take pride in our trade, crafting each home as if it were our own. Our quality, affordable homes are energy smart and thoughtfully personalized for your active Utah lifestyle. We currently have townhomes available in Salt Lake County, single-family homes in Heber City, and 55-plus single-family homes in West Jordan. Contact us today to find your dream home.

Want home decorating and maintenance tips, craft ideas, recipes, and more delivered right to your inbox?
Sign up for our monthly newsletter:


