‘Tis the season to deck the halls … But where do you start? Here are a few tips that can help you hang Christmas lights like a pro!
Plan Your Design
The first step to any great project is making sure you have a plan in place. Having a general design plan will save time and energy and help create an overall cohesive and impressive look. Questions to ask yourself when designing your look include:
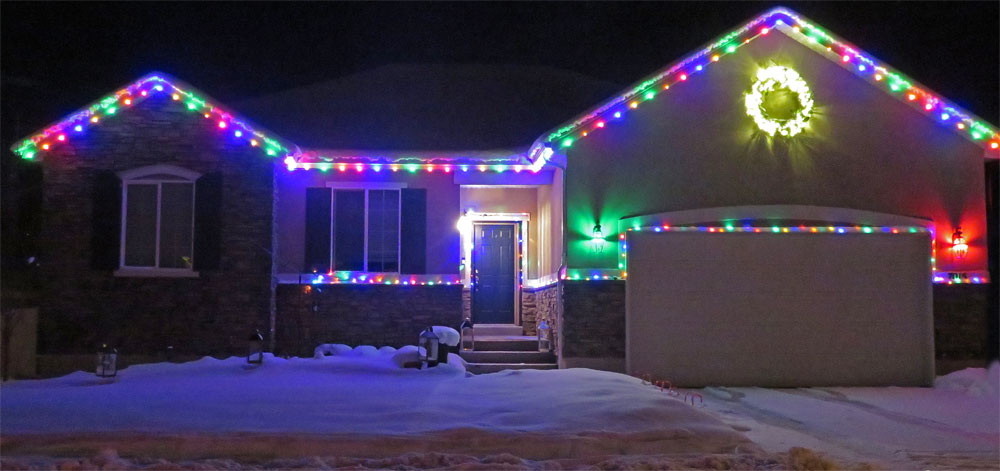
 Is there a focal point to highlight? For example, any distinctive architectural features that would pop with lights or other holiday décor. For example, the large front porch with its pillars on this model home at Liberty Cove @ Day Ranch would be a great focal point. Or how about lining those roof lines with strings of lights? Picking a point to highlight and center design around is a great way to start your magazine-worthy light display.
What color of light do you want to include? Multicolor, all white, one or two solid colors … the possibilities are endless when it comes to light color. It really comes down to personal preference.
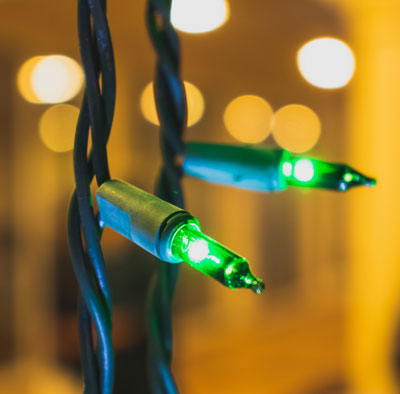
What type of lights do you want? Smaller miniature bulbs, the larger more traditional bulbs, spheres, icicles, lights that stay steadily lit, motion lights … There are so many options available now, and it again comes down to your personal style preferences.
How many lights do you need? Make sure you carefully measure everywhere you want to install lights to ensure you have enough. And it’s probably not a bad idea to have extras on-hand just in case. While measuring also plan out your strategy on connecting lights. You don’t want to overload the circuit. The number of strings you can plug into each other depends on several factors, including bulb size, LED vs. incandescent bulbs, string length, and wattage. Check the manufacturers recommendations on your lights to determine the maximum number to string together.
Are there other décor items do you want in addition to lights? A wreath on the door is always a nice addition to any holiday décor. Want a whimsical winter wonderland? Blow ups may be a nice addition to your house lights. If you’re looking for a more sophisticated look, you might consider adding lighted presents or a holiday lamp post or path lights. Every year, local stores are filled with numerous options that fit any design style.
Check and Double Check Everything First
 Picture this: You hang all your lights. Then you hit the switch and … only half the lights come on. Before you even think about climbing a ladder and installing lights, check all of your lights. Start with the wires. Frayed or damaged wires are a big no-no. Each year, Christmas lights cause thousands of house fires and account for millions of dollars in damage in the United States. You definitely don’t want to be among those statistics, so carefully inspect wires for damage. If you find any frays or damage, replace them. This also goes for any extension cords, outlets, etc., you are using.
After checking the wires, plug in each string and look for burned-out bulbs to replace. It’s much easier to replace bulbs before you hang them up. To easily find the burned-out bulb, a light tester is very handy.
Next, check outlets you will be plugging lights into. For safety, you should connect lights to a ground fault circuit interrupter (GFCI) outlet, which will shut the circuit down if there is overcurrent. A qualified electrician can install a GFCI outlet outdoors for you. A good alternative is a portable outdoor unit from a local hardware store.
Finally, check your supplies and make sure you have everything you need to complete the project. Extension cords should be UL approved extension cords specific for outdoor use. Light clips found at hardware stores make installation a breeze. For the cleanest look, use a clip for each light. You can attach the clips to the lights before you begin installation to make it easier on yourself. When buying clips, it is a good idea to buy extras. Because they are plastic, it is not uncommon to break some during installation.
Installation Tips
Once you have everything ready to go, it’s time to install everything! There are two key things you need for installation: a sturdy ladder and a friend. Inspect your ladder before use to ensure it is in proper working condition, then set it up on a solid, flat surface.
The buddy system is also a must for both safety reasons and ease of installation. Use that second set of hands to stabilize your ladder and to hand you lights, clips, and anything else you may need during the process.
Happy decorating and happy holidays from Liberty Homes!
Looking for that dream home where you can decorate to your heart’s content every holiday? Contact Liberty Homes today!

